Enable SSH on Synology DSM Link to heading
- Login to your Synology DSM web interface
- Open Control Panel
- Go down to “Terminal & SNMP”
- Select “Enable SSH Service” and click apply then click OK.
Edit the file that controls webhook based notifications Link to heading
-
SSH into your Synology.
-
Run the following command:
sudo vim /usr/syno/etc/synowebhook.conf -
Assuming you have no webhooks currently configured add the following to the file:
{ "Discord": { "needssl": false, "port": 8090, "prefix": "A new system event occurred on your %HOSTNAME%", "req_header": "", "req_method": "post", "req_param": "{\"username\":\"Synology\", \"avatar_url\": \"https://play-lh.googleusercontent.com/HjbYWbXJ-6e6Cia-mBbHDSdontW1yE6MHMaXqlHW80CQegDOEPQ1HGACxvEpnqCUHgo\", \"embeds\": [{\"description\": \"@@TEXT@@\", \"title\": \"@@PREFIX@@\"}]}", "sepchar": " ", "template": "$webhook_url", "type": "custom", "url": "$webhook_url" } } -
Replace $webhoook_url with your webhook from discord.
Test the notifiication works Link to heading
- Login to your Synology DSM web interface.
- Open Control Panel.
- Go to “Notification” then the “Push Service” tab then click “Manage Webhooks” at the bottom.
- Click on the “Discord” webhook and click “Send Test Message”
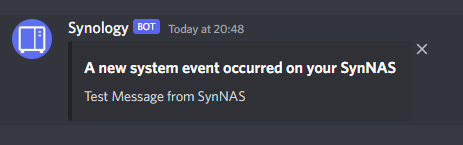
If everything is configured it will send a discord message to your channel that looks like the following: